
Your Digital Banking Checklist for Personal Memberships
New and improved digital banking
For business members, see the Digital Banking Checklist for Business Memberships
Welcome to your new Digital Banking experience! We’ve made it easier to manage your finances with enhanced tools, improved navigation, and personalized features.
Steps all members need to complete
On or after July 21, use this checklist to log in for the first time and get started. A downloadable PDF version is also available.
Scammers often become more active during times of change. Stay a step ahead of fraudsters — read our latest article to learn which account details and security credentials should always remain private.
You can log in for the first time from our website or using our mobile app.
Watch the video | How to Log in to Digital Banking
Apple (iPhone/iPad) users
- For Apple users who have their apps set to update automatically, the app will update in the late evening of July 20. Otherwise, you’ll tap to update the app manually and instantly.
Android users
- Visit your preferred app store and download our new app in seconds.
Primary Account Owners
Use these steps if you used our previous digital banking platform and your credentials were used for logging in.
Steps to get started
- Enter your current credentials — if you have multiple memberships, use the credentials associated with the membership you opened first (your lowest member number). Visit the digital banking login screen to get started.
- You will be prompted to update your password the first time you log in
- Read and accept the Terms and Conditions to change your password
- Choose the account type that best fits your needs
- Verify your identity by filling in your personal information
- Reset your password by receiving a code via phone call or text message
- Confirm your identity by inputting the code
- Create your new password
- Read and accept the Terms and Conditions (you will only be asked this once)
- Now you’re logged in!
Joint Account Owners
If you previously shared login credentials with the primary owner, you now get to create your own.
Steps to get started
- Visit the digital banking login screen and click the Register a New Account button
- You’ll be asked if you’d like to register for an individual or a business account. Please select the option that best fits your needs
- Verify your identity by filling in your personal information
- Set your password by receiving a code via phone call or text message
- Confirm your identity by inputting the code
- Create your password
- Read and accept the Terms and Conditions (you will only be asked this once)
- Now you’re logged in!
Helpful Tip: Enable biometric login (Face ID or fingerprint) in your mobile app for faster, secure access.
Entirely new to digital banking?
If this is your first time ever using digital banking with OSCU, visit the digital banking login screen, click the Register a New Account button, and follow the same instructions noted directly above. And welcome to digital banking!
Watch the video | Dashboard Tour and Customizing Options
What you’ll notice right away
When you log in, your new dashboard brings everything together in one place:
- All your accounts are visible with a single login
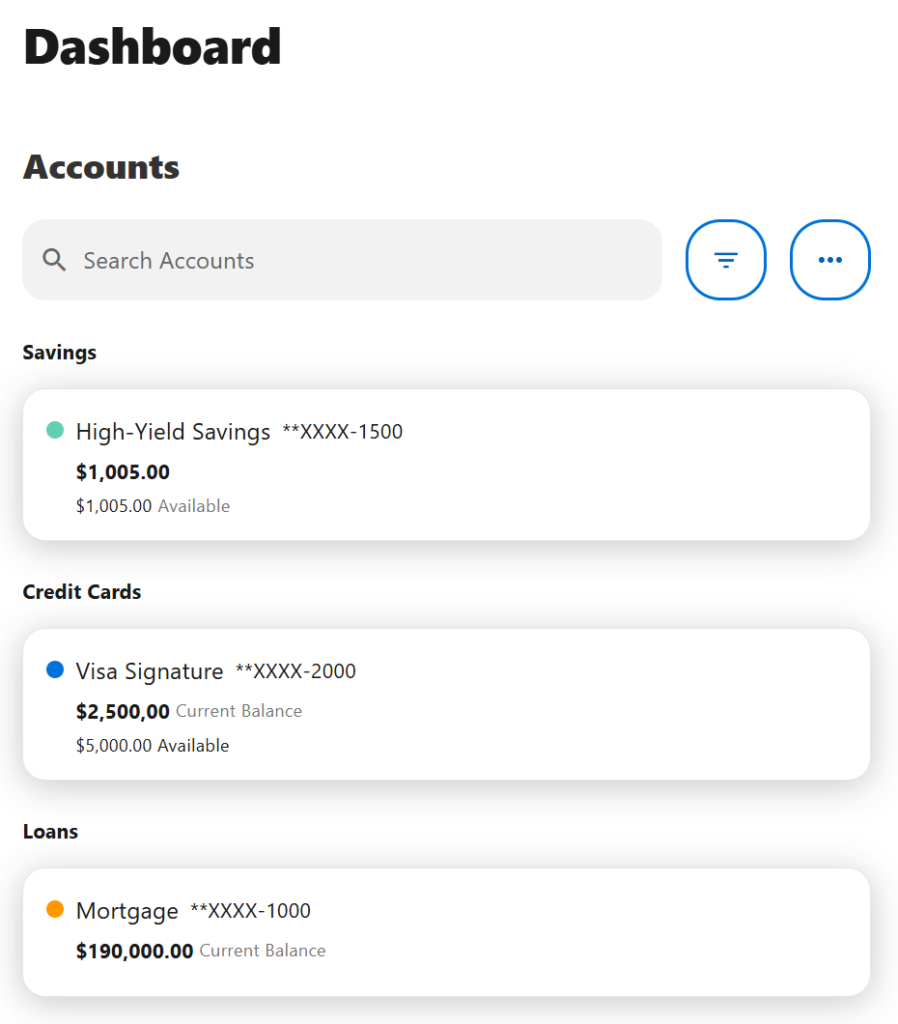
How your accounts are organized
You may see more accounts than before — this is expected.
That’s because:
- Our new platform is person-centric, which means you can manage all your memberships and accounts with one login.
- If you have multiple memberships, they are now grouped together.
- If you are a joint owner on any account(s), they are included automatically.
View your Statements
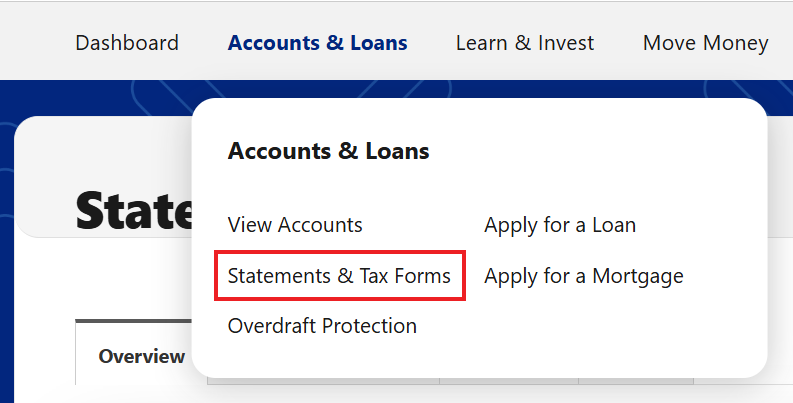
To access your statements, select Accounts & Loans from the navigation menu. On mobile devices, tap the three-dot menu to access Accounts & Loans. Then select Statements & Tax Forms.
- Your delivery method stays the same (paper or eStatements)
- Primary member owners have eStatement access
- eStatement access for other account owners depends on several factors, including the account type and ownership settings.
Customize your view to fit your needs
You’re in control of how your dashboard looks.
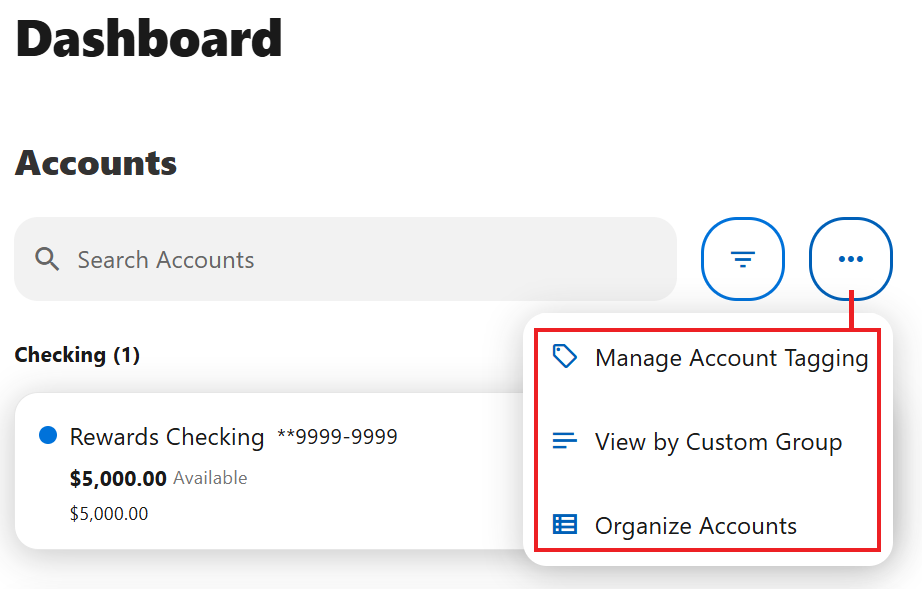
You can:
- Rename accounts (ex: “Everyday Checking”)
- Reorder accounts by priority
- Hide accounts you don’t use often
Helpful Tip: Take a minute after your first login to organize your accounts — it makes everyday banking faster and easier.
Steps some members may also need to complete after logging in
Watch the video | How to Link External Accounts
Get a 360-degree view of your finances by linking accounts you have at other banks and credit unions. Once connected, you’ll be able to view your external accounts alongside your Oregon State Credit Union accounts in one convenient place.
Steps to Get Started
- From the Dashboard, select Link External Accounts beneath the Credit Score widget
- In the mobile app, select Open or Link an Account
Choose from the three options that best fits your needs
OPTION 1 (preferred method)
Add external account
Sign in using the credentials from your other financial institution. This is the fastest way to connect your account and allows you to begin making transfers immediately.
- Select Add an External Account
- Review and accept the Terms and Conditions
- Sign in to Plaid using your phone number
- Enter the verification code sent via text message
- Select Add New Account
- Search for your financial institution or select it from the list
- Enter the username and password you use with that financial institution
- Complete any additional identity verification if prompted
- Select the account(s) you’d like to connect
- Select Done
You’re All Set!
Refresh your Dashboard and you’ll see your linked accounts displayed under External Accounts, below your Oregon State Credit Union accounts.
OPTION 2
Manually add an external account
Enter your routing number and account number to begin the verification process. Verification may take up to three business days, after which you’ll be able to make transfers to and from the account.
- Select Manually Add Account
- Enter your routing number and account number
- Follow the prompts to begin verification
- Watch for the micro-deposit verification process to complete
- Once verified, your account will be available for transfers and account viewing
You’re All Set!
OPTION 3
Send money to another OSCU member
Connect to another OSCU member’s account so you can easily transfer money between accounts. The recipient will be notified of the connection by email.
- Select Send money to another Oregon State Credit Union Member
- Enter recipient last name or business name
- Under Account details select Account as the verification method
- Select the account type, enter the account number, and the Share ID
- Select the Save Account For Future Use box if you want to save this account information for future transfers.
You’re All Set!
Refresh your Dashboard and you’ll see your linked accounts displayed under External Accounts, below your Oregon State Credit Union accounts.
Watch the video | How to Transfer Money
Re-establish external transfers
If you set up any recurring or one-time transfers to an external account (outside of OSCU) through digital banking, you’ll need to set them up again.
Note: This only applies to transfers you originally created in digital banking — not transfers set up in a branch, over the phone, or through bill pay.
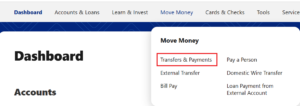
Steps to review or re-establish your transfers
- If you are using a web browser, hover over Move Money
- If you are using the mobile app, tap the three dots to access the More menu at the bottom-right, tap Move Money
- Select Transfers & Payments
- Select the account you want to transfer from and to
- Enter the transfer amount
- Choose a date (or set up recurring transfers)
- Review and confirm
Review and confirm all other transfer settings
Most of your other scheduled payment and transfer settings are expected to convert to the new system, so you can keep everything running without interruption. However, we recommend you confirm your settings for the following transfer types look accurate:
- Internal transfers: Any scheduled transfers between your own OSCU accounts.
- Transfers to other OSCU members: Any scheduled transfers you’ve set up to other OSCU member will continue to be available in the new platform. You’ll be able to easily identify these transfers when reviewing your transfer settings.
- Person-to-person scheduled payments: These are the individual people (not businesses) you send scheduled transfers to utilizing the Pay It Now tool in our previous digital banking platform. In the new platform you will review these scheduled payments in the Pay a Person tool in the Move Money section.
Simply visit the Move Money section on the top navigation (or bottom navigation in the mobile app) and double check everything is set up as expected.
Pay special attention to your Bill Pay settings in the Move Money section to avoid missed or unexpected payments.
Watch the video | How to Set Up Bill Pay
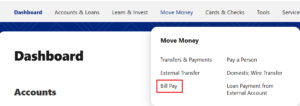
Review your bill pay settings
Bill Pay allows you to schedule payments to companies like utilities, subscriptions, and other service providers. If you previously used bill pay with OSCU, we expect most of your settings to convert to the new system. However, we recommend you use the steps below to confirm everything looks accurate.
Steps to review your Bill Pay settings
- If you are using a web browser, hover over Move Money
- If you are using the mobile app, tap the three dots to access the More menu at the bottom-right, tap Move Money
- Select Bill Pay
- Select Manage Billers and review your list of billers. If a biller you previously used is missing, you’ll need to add it again
- Select Settings to review or edit your default payment method and notification preferences
- Enter the amount you want to pay in the payment field
- Once you’ve confirmed everything looks correct, you’re ready to make payments
Need to add a missing biller?
- If you are using a web browser, hover over Move Money
- If you are using the mobile app, tap the three dots to access the More menu at the bottom-right, tap Move Money
- Select Bill Pay
- Use the Add New Billers widget to search for a biller to add
- Provide the information requested by the biller such as bill account number and zip code
- If your biller is not listed you can add them manually by selecting Add Biller Manually and providing the account information
- Now your biller is ready
Make a payment
- If you are using a web browser, hover over Move Money
- If you are using the mobile app, tap the three dots to access the More menu at the bottom-right, tap Move Money
- Select Bill Pay
- Select Pay Bills
- Select the biller you want to pay
- Enter the payment information
- Select Pay Now
- Review or edit the payment information
- Select Pay Total
- Your payment is scheduled
Helpful Tips
You’ll see whether a payment is sent electronically or by check.
Delivery timelines will be shown before you confirm.
- Electronic: 1–2 business days
- Check: 5–7 business days
Set Up eBills
eBills allow participating companies to send your bill directly into Bill Pay, so you can view the amount due and schedule payments from one place.
Steps to get started
- If you are using a web browser, hover over Move Money
- If you are using the mobile app, tap the three dots to access the More menu at the bottom-right, tap Move Money
- Select Bill Pay
- Make sure the company has already been added as a biller in Bill Pay
- Select Manage Billers
- Locate the biller and look for the Link eBill option (if Link eBill is not displayed, that company may not support eBills)
- Select Link eBill
- Enter the account number found on your bill
- Select Continue
- Once setup is complete, your eBills will appear within Bill Pay when available
Watch the video | How to Set Up Account Alerts
Account alerts and notifications, including card and transaction alerts won’t carry over to the new platform — so you’ll need to set them up again after logging in. Before setting up alerts, you’ll need to enable text messaging if you’d like to receive alerts by SMS.
Enable SMS Notifications (Optional)
- If you are using a web browser, select your profile icon in the upper-right corner, then select Settings
- If you are using the mobile app, tap the three dots at the bottom-right to access the More menu, then tap on Settings
- Select Contact
- Select the edit icon next to your mobile phone number
- Check the box to enable SMS text messages to this number
- Select Send a code via text
- Verify your phone number by providing the code sent to your mobile number
- You will be sent a secondary alphanumeric code to confirm your mobile number, input that code
- Select Confirm Code
- You will now see the status as Confirmed
- Select Save Changes
- You’re all set! Now you can receive alerts and notifications via SMS text message
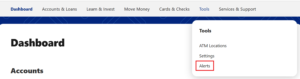
Steps to set up Alerts
- If you are using a web browser, hover over Tools in the top navigation.
- If you are using the mobile app, tap the three dots at the bottom-right to access the More menu, then tap on Tools
- Select Alerts
- Choose the alert type from the list on the left side. For account specific alerts, select the account from the drop down menu
- Set up the alert using the toggle
- Choose the delivery method for the alert
- Confirm the contact information for the alert
- Select Save
Enjoy expanded ways to manage eligible debit and credit cards online, including turning cards on or off, reporting a card lost or stolen, requesting a replacement card, and more. If you have a business membership, you’ll also be able to manage your business cards in this tool (when logging in with your personal membership credentials). Whether you’re new to this feature or you used it in our previous system, you’ll need to setup/re-setup your card alerts after log in:
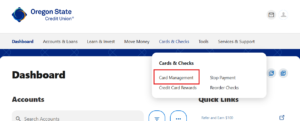
Steps to set up Card Alerts
- While logged into your personal membership account using a web browser, hover over Cards & Checks in the top navigation.
- While logged into your personal membership account using the mobile app, tap the three dots at the bottom-right to access the More menu, then tap on Cards & Checks
- Select Card Management
- Choose the card you’d like to manage
- Select Alerts and Controls
- Select Manage Card Alerts
- Configure the transaction alerts using the different
toggles - Choose the delivery method for the alert (you will only have to do this once)
Steps to set up Card Controls
- If you are using a web browser, hover over Cards & Checks in the top navigation.
- If you are using the mobile app, tap the three dots at the bottom-right to access the More menu, then tap on Cards & Checks
- Select Card Management
- Choose the card you’d like to manage
- Select Alerts and Controls
- Select Manage Card Controls
- Configure the card controls using the different toggles
Steps to set up Travel Notices
- If you are using a web browser, hover over Cards & Checks in the top navigation.
- If you are using the mobile app, tap the three dots at the bottom-right to access the More menu, then tap on Cards & Checks
- Select Card Management
- Choose the card you’d like to manage
- Select Travel Notices
- Input the dates and location of your travel
- Select Save
If you used QuickBooks, Quicken, or other Intuit tools in our previous digital banking platform, your connection will need to be re-established in the new platform.
Follow these steps for setting up your Intuit tools:

We’re here to help!
Have questions? We’re here for you.
Please note, due to increased call and chat volume following our launch, wait times may be longer than usual. We appreciate your patience and will serve you as promptly as possible.
Chat with us by clicking or tapping the chat icon on screen
Call us at (541) 714-4000 or (800) 732-0173 and choose option 1
Monday – Friday, 8:30 a.m. – 5:30 p.m.
We heard you! New digital banking benefits

All your accounts, all in one place
Get ready for a digital banking experience that’s simple, connected, and organized!
- Our new platform is individual-centric, which means you can manage all your memberships and accounts with one login.
- Ability to customize and personalize what accounts display in your profile
- Access all statements and documents from one location
- Joint owners get their own login credentials, with the ability to set up custom alerts and settings
- Ability to easily load and integrate account information from your other financial institutions, so you see one aggregate view of your finances all in one place!
- Easily review upcoming certificate maturity dates and select how you’d like your funds handled

Modern design and easy navigation — on any device
Manage your finances with an upgraded, worldclass interface designed for clarity and simplicity — no matter what device you use!
- Log in and see all your memberships and accounts on your welcome dashboard
- Ability to name your accounts with nicknames for easy identification
- Streamlined menus and clearer paths to the tools you use most
- Smarter, customizable alerts that keep you informed
- A mobile app and desktop experience that have all the same features and work the same way
- Improved accessibility across all devices

New financial wellness tools
Get the tools and resources you need to move your financial life forward.
- Free access to your credit score and credit score alerts
- Enhanced financial insights to help you track spending and trends
- Personalized notifications for balances, payments, and more
- Tools to help you set goals, understand your spending and savings habits, and stay on track

Enhanced payments, transfers, and bill pay
Send and receive money however you prefer, all in one place.
- Send money in minutes to trusted friends, family or colleagues through fast and easy person-to-person (P2P) payments
- Move funds easily between financial institutions
- Make all your loan payments from digital banking
- Enjoy a better bill pay experience, with more options and a simplified interface

New and improved business banking
Enjoy a state-of-the-art business banking platform that delivers what you need.
- More advanced and customizable admin and user permission controls
- Enhanced insights and reporting
- Improved payment and transfer capabilities
- Self-access to new tools, including sub user and entitlement management, transaction and limit management, and dual authorization requirements
- Dedicated business banking login credentials to improve security

Enhanced security
Feel protected with some of the industry’s most advanced security features, while also keeping your log in process fast and convenient.
- Improved security features, including two-factor identification and authentication app integration capabilities
- Get notifications when your account is accessed by new devices