
Your Digital Banking Checklist for Business Memberships
New and improved digital banking
For personal memberships, see the Digital Banking Checklist for Personal Memberships
We’ve made it easier to manage your business finances with enhanced tools, improved navigation, and flexible features designed to support your day-to-day banking needs.
Steps all members need to complete
On or after July 21, use this checklist to log in for the first time and get started. A downloadable PDF version is also available.
Scammers often become more active during times of change. Stay a step ahead of fraudsters — read our latest article to learn which account details and security credentials should always remain private.
You can log in for the first time from our website or using our mobile app.
Watch the video | How to Log in to Digital Banking
Apple (iPhone/iPad) users
- For Apple users who have their apps set to update automatically, the app will update in the late evening of July 20. Otherwise, you’ll tap to update the app manually and instantly.
Android users
- Visit your preferred app store and download our new app in seconds.
Business Administrators/Sub Users
Use these steps if you used our previous digital banking platform and your credentials were used for logging in.
Steps to get started
- Enter your current business credentials — make sure they are the same username and password you used to previously access digital banking. Visit the digital banking login screen to get started.
- You will be prompted to update your password the first time you log in
- Read and accept the Terms and Conditions to change your password
- Choose the business account type that best fits your needs
- Verify your identity by filling in your business information
- Reset your password by receiving a code via phone call or text message
- Confirm your identity by inputting the code
- Create your new password
- Read and accept the Terms and Conditions (you will only be asked this once)
- Now you’re logged in!
New business digital banking users
If you’re a business member and have never used digital banking before, you’ll need to complete a couple of quick steps to register.
Steps to get started
- Visit the digital banking login screen and click the Register a New Account button
- You’ll be asked if you’d like to register for an individual or a business account. Select the business option.
- Confirm your identity by providing key information
- Set your password by receiving a code via phone call or text message
- Confirm your identity by inputting the code
- Create your password
- Read and accept the Terms and Conditions (you will only be asked this once)
- Now you’re logged in!
Helpful Tip: Enable biometric login (Face ID or fingerprint) in your mobile app for faster, secure access.
Watch the video | Business Dashboard Tour and Customization
What you’ll notice right away
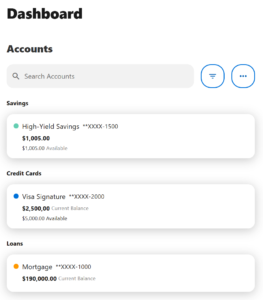
When you log in using your business membership credentials, your new dashboard organizes all your business accounts in one place. Accounts are organized by type, making it easy to find the information you need, including:
- Business Checking
- Business Savings
- Business Credit Cards
- Business Loans
Click any account to view balances, transaction history, account details, and more.
When you log in using your personal membership
Our new platform is person-centric, which means if you have a personal account at the credit union and log in with those credentials, you’ll have access to all your personal memberships and accounts.
When you log in using your business membership
To access your business accounts, features, and administrative tools, you’ll log in using your business membership credentials.
Option to access all your memberships with one login
You have an available option to manage all your personal and business membership accounts with one login, easily toggling between them (no matter which credentials you choose to use). If you’re interested in this feature, please contact us and we’ll be happy to help set this up for you!
Access your business banking tools
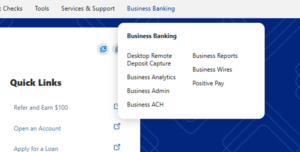
The Business Banking menu provides quick access to the business services available to your organization. Because every business is different, your Business Banking menu is customized based on the services you’re enrolled in. Depending on your setup, you may see options such as:
- Desktop Remote Deposit Capture
- Business Admin
- Business Reports
- Business Wires
- Business ACH
View your Statements
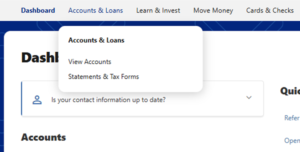
To access your statements, select Accounts & Loans from the navigation menu. On mobile devices, tap the three-dot menu to access Accounts & Loans. Then select Statements & Tax Forms.
- Your delivery method stays the same (paper or eStatements)
- Sub Users will keep access to the statements you set previously
Customize your view to fit your needs
You’re in control of how your dashboard looks.
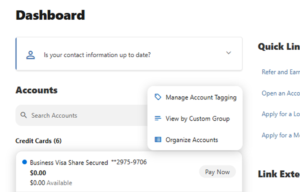
You can:
- Rename accounts (ex: “Payroll Checking”)
- Reorder accounts by priority
- Hide accounts you don’t use often
Helpful Tip: Take a minute after your first login to organize your accounts — it can help make your business banking faster and easier.
Take time to review your business sub users and their permissions in the Business Admin section under the Business Banking tab in the top navigation bar.
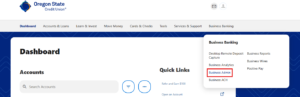
You will need to log in via our website and note, add, edit permission, or add/delete sub users (this functionality is not available in the app).
To view or edit a sub user’s permissions
You can choose exactly what each sub user is able to view and actions they can complete down to the individual account level, based on business needs and their individual responsibilities.
Steps to get started:
- Go to Business Banking in the top navigation
- Select Business Admin
- Select the User tab and click the user you want to edit/view permissions for
- Select the sub user you want to review, the Summary tab will open giving an overview of the sub user’s information and permissions
- Select the General Permissions, Payment Permissions, or Account Access tabs to review or edit the relevant permission type
- Click Manage [permission type] to edit the permissions in that category
- Once permissions have been updated click Save
If you need to add a new sub user
Sub users allow you to grant specific permissions to people within your business who need access as part of their role.
Steps to get started:
- Go to Business Banking in the top navigation
- Select Business Admin
- Select the User tab and click the + icon next to the search bar
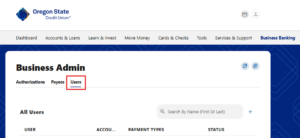
- Choose New User to create a new sub user from the ground up, or choose Copy a User to copy the permissions of an existing user
- Enter the new sub user’s information and assign them a username
- Review and establish user permissions and transaction limits
- Select accounts the new sub user will have access to
- Review and establish account specific permissions
- Final review of new sub user information and permissions and click Submit
- Creating a new sub user or editing permissions requires authentication, so you need to select to receive a code via email, text, call, or token
- Your new sub-user has been created. Share the username you assigned with the new user and have them follow the first-time log in instructions for Business Administrators/Sub Users to complete their first-time login and account setup
Steps some members may also need to complete after logging in
Watch the video | How to Link External Accounts
Get a 360-degree view of your finances by linking accounts you have at other banks and credit unions. Once connected, you’ll be able to view your external accounts alongside your Oregon State Credit Union accounts in one convenient place.
Steps to Get Started
- From the Dashboard, select Link External Accounts beneath the Credit Score widget
- In the mobile app, select Open or Link an Account
Choose from the three options that best fits your needs
OPTION 1 (preferred method)
Add external account
Sign in using the credentials from your other financial institution. This is the fastest way to connect your account and allows you to begin making transfers immediately.
- Select Add an External Account
- Review and accept the Terms and Conditions
- Sign in to Plaid using your phone number
- Enter the verification code sent via text message
- Select Add New Account
- Search for your financial institution or select it from the list
- Enter the username and password you use with that financial institution
- Complete any additional identity verification if prompted
- Select the account(s) you’d like to connect
- Select Done
You’re All Set!
Refresh your Dashboard and you’ll see your linked accounts displayed under External Accounts, below your Oregon State Credit Union accounts.
OPTION 2
Manually add an external account
Enter your routing number and account number to begin the verification process. Verification may take up to three business days, after which you’ll be able to make transfers to and from the account.
- Select Manually Add Account
- Enter your routing number and account number
- Follow the prompts to begin verification
- Watch for the micro-deposit verification process to complete
- Once verified, your account will be available for transfers and account viewing
You’re All Set!
OPTION 3
Send money to another OSCU member
Connect to another OSCU member’s account so you can easily transfer money between accounts. The recipient will be notified of the connection by email.
- Select Send money to another Oregon State Credit Union Member
- Enter recipient last name or business name
- Under Account details select Account as the verification method
- Select the account type, enter the account number, and the Share ID
- Select the Save Account For Future Use box if you want to save this account information for future transfers.
You’re All Set!
Refresh your Dashboard and you’ll see your linked accounts displayed under External Accounts, below your Oregon State Credit Union accounts.
Watch the video | How to Transfer Money
Re-establish external transfers
If you set up any recurring or one-time transfers to an external account (outside of OSCU) through digital banking, you’ll need to set them up again.
Note: This only applies to transfers you originally created in digital banking — not transfers set up in a branch, over the phone, or through bill pay.
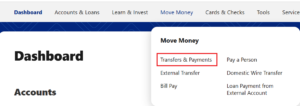
Steps to review or re-establish your transfers
- If you are using a web browser, hover over Move Money
- If you are using the mobile app, tap the three dots to access the More menu at the bottom-right, tap Move Money
- Select Transfers & Payments
- Select the account you want to transfer from and to
- Enter the transfer amount
- Choose a date (or set up recurring transfers)
- Review and confirm
Review and confirm all other transfer settings
Most of your other scheduled payment and transfer settings are expected to convert to the new system, so you can keep everything running without interruption. However, we recommend you confirm your settings look accurate for the following transfer types:
- Internal transfers: Any scheduled transfers between your own OSCU accounts.
- Transfers to other OSCU members: Any scheduled transfers you’ve set up to other OSCU members will continue to be available in the new platform. You’ll be able to easily identify these transfers when reviewing your transfer settings.
Simply visit the Move Money section on the top navigation (or bottom navigation in the mobile app) and double check everything is set up as expected.
Pay special attention to your Bill Pay settings in the Move Money section to avoid missed or unexpected payments.
Watch the video | How to Set Up Bill Pay
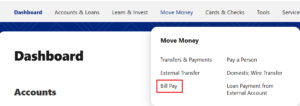
Review your bill pay settings
Bill Pay allows you to schedule payments to companies like utilities, subscriptions, and other service providers. If you previously used bill pay with OSCU, we expect most of your settings to convert to the new system. However, we recommend you use the steps below to confirm everything looks accurate.
Steps to review your Bill Pay settings
- If you are using a web browser, hover over Move Money
- If you are using the mobile app, tap the three dots to access the More menu at the bottom-right, tap Move Money
- Select Bill Pay
- Select Manage Billers and review your list of billers. If a biller you previously used is missing, you’ll need to add it again
- Select Settings to review or edit your default payment method and notification preferences
- Enter the amount you want to pay in the payment field
- Once you’ve confirmed everything looks correct, you’re ready to make payments
Need to add a missing biller?
- If you are using a web browser, hover over Move Money
- If you are using the mobile app, tap the three dots to access the More menu at the bottom-right, tap Move Money
- Select Bill Pay
- Use the Add New Billers widget to search for a biller to add
- Provide the information requested by the biller such as bill account number and zip code
- If your biller is not listed you can add them manually by selecting Add Biller Manually and providing the account information
- Now your biller is ready
Make a payment
- If you are using a web browser, hover over Move Money
- If you are using the mobile app, tap the three dots to access the More menu at the bottom-right, tap Move Money
- Select Bill Pay
- Select Pay Bills
- Select the biller you want to pay
- Enter the payment information
- Select Pay Now
- Review or edit the payment information
- Select Pay Total
- Your payment is scheduled
Helpful Tips
You’ll see whether a payment is sent electronically or by check.
Delivery timelines will be shown before you confirm.
- Electronic: 1–2 business days
- Check: 5–7 business days
Set Up eBills
eBills allow participating companies to send your bill directly into Bill Pay, so you can view the amount due and schedule payments from one place.
Steps to get started
- If you are using a web browser, hover over Move Money
- If you are using the mobile app, tap the three dots to access the More menu at the bottom-right, tap Move Money
- Select Bill Pay
- Make sure the company has already been added as a biller in Bill Pay
- Select Manage Billers
- Locate the biller and look for the Link eBill option (if Link eBill is not displayed, that company may not support eBills)
- Select Link eBill
- Enter the account number found on your bill
- Select Continue
- Once setup is complete, your eBills will appear within Bill Pay when available
Watch the video | How to Set Up Account Alerts
Account alerts and notifications, including card and transaction alerts won’t carry over to the new platform — so you’ll need to set them up again after logging in. Before setting up alerts, you’ll need to enable text messaging if you’d like to receive alerts by SMS.
Enable SMS Notifications (Optional)
- If you are using a web browser, select your profile icon in the upper-right corner, then select Settings
- If you are using the mobile app, tap the three dots at the bottom-right to access the More menu, then tap on Settings
- Select Contact
- Select the edit icon next to your mobile phone number
- Check the box to enable SMS text messages to this number
- Select Send a code via text
- Verify your phone number by providing the code sent to your mobile number
- You will be sent a secondary alphanumeric code to confirm your mobile number, input that code
- Select Confirm Code
- You will now see the status as Confirmed
- Select Save Changes
- You’re all set! Now you can receive alerts and notifications via SMS text message
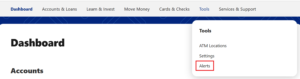
Steps to set up alerts
- If you are using a web browser, hover over Tools in the top navigation.
- If you are using the mobile app, tap the three dots at the bottom-right to access the More menu, then tap on Tools
- Select Alerts
- Choose the alert type from the list on the left side. For account specific alerts, select the account from the drop down menu
- Set up the alert using the toggle
- Choose the delivery method for the alert
- Confirm the contact information for the alert
- Select Save
If you used the card management tool in our previous digital banking platform, card management features will no longer be available when you log in using your business membership credentials. We are working to bring back this access in the future and can offer this immediate solution:
Please log in with your personal membership credentials and you will be able to setup and manage both your personal and business cards from your personal digital banking profile.
If you do not currently have a personal membership with Oregon State Credit Union, we are happy to open this for you so that you can enjoy this feature, as well as the many other benefits of a personal membership account.
After logging in with your personal membership credentials, you can setup/re-setup your card alerts and controls (including business cards) with the following steps:
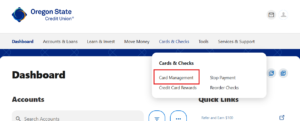
Steps to set up Card Alerts
- While logged into your personal membership account using a web browser, hover over Cards & Checks in the top navigation.
- While logged into your personal membership account using the mobile app, tap the three dots at the bottom-right to access the More menu, then tap on Cards & Checks
- Select Card Management
- Choose the card you’d like to manage
- Select Alerts and Controls
- Select Manage Card Alerts
- Configure the transaction alerts using the different
toggles - Choose the delivery method for the alert (you will only have to do this once)
Steps to set up Card Controls
- If you are using a web browser, hover over Cards & Checks in the top navigation.
- If you are using the mobile app, tap the three dots at the bottom-right to access the More menu, then tap on Cards & Checks
- Select Card Management
- Choose the card you’d like to manage
- Select Alerts and Controls
- Select Manage Card Controls
- Configure the card controls using the different toggles
Steps to set up Travel Notices
- If you are using a web browser, hover over Cards & Checks in the top navigation.
- If you are using the mobile app, tap the three dots at the bottom-right to access the More menu, then tap on Cards & Checks
- Select Card Management
- Choose the card you’d like to manage
- Select Travel Notices
- Input the dates and location of your travel
- Select Save
If you used QuickBooks, Quicken, or other Intuit tools in our previous digital banking platform, your connection will need to be re-established in the new platform.
Follow these steps for setting up your Intuit tools:

We’re here to help!
Have questions? We’re here for you.
Please note, due to increased call and chat volume following our launch, wait times may be longer than usual. We appreciate your patience and will serve you as promptly as possible.
Chat with us by clicking or tapping the chat icon on screen
Call us at (541) 714-4000 or (800) 732-0173 and choose option 1
Monday – Friday, 8:30 a.m. – 5:30 p.m.
New digital banking benefits for our business members

Account Access & Controls
Role-Based Access Management
Grant employees secure, customized access based on their role. Assign permissions for viewing balances, initiating transactions, or approving payments — giving you flexibility to delegate while maintaining full control.
Advanced Activity Reporting
Generate detailed, exportable reports on ACH activity, account transactions, and user actions. Gain full visibility into who did what and when, simplifying audits, reconciliation, and financial tracking.

Insights & Financial Visibility
Business Insights & Analytics
Access powerful tools through the Business Health dashboard to analyze cash flow, track income and expenses, and benchmark performance. Receive personalized insights to help identify growth opportunities and improve financial decision-making.
External Account Linking
Bring your full financial picture together by linking accounts from other institutions. View balances and manage cash flow across all accounts in one place.

Security & Fraud Protection
Positive Pay Protection
Reduce fraud risk by matching checks presented for payment against your issued check list — an optional add-on service available to business members that provides an enhanced layer of protection to help quickly detect and prevent unauthorized transactions.

Payments & Moving Money
Custom Account Grouping
Organize accounts — such as external checking and credit cards — into customized views for easier monitoring and financial management.